Best Monitor Settings for Gaming (8 Adjustments to Make!)
Gaming has evolved over the years – the latest video games have become more realistic, interactive, and immersive. You almost feel as though you’re in the game!
But to be able to enjoy this immersive, tactile experience, you have to correctly set up your gaming monitor and calibrate certain settings. After all, monitors don’t come with these optimal gaming settings out-of-the-box.
The best monitor settings for gaming require small tweaks to screen resolution, pixel density, aspect ratio, brightness, contrast, color temperature, gamma settings, and refresh rate. For the best gaming experience, you’ll want to adjust each of these settings to your liking. Every monitor is different, so play around with different combinations!
In this post, I’ll teach you exactly how to set each of these monitor settings for gaming so you can have a great time behind the screen!
Why do you need to calibrate your monitor for gaming?
Calibration is the process of adjusting the settings of your monitor to give you the exact display that you want. It involves changing various parameters such as brightness, gamma, and contrast.
By calibrating your monitor, you’ll get more consistent colors with ambient lighting conditions. The adjustments can also help protect your eyes from straining when gaming for long hours.
However, you need to know that gaming monitors have poor homogeneity, meaning the screen will have different brightness, contrast, and color temperatures at each measuring point.
The differences are barely noticeable, so it shouldn’t be too big of a concern for gamers.
Parameters for the best monitor settings for gaming
Getting the best monitor display for gaming does not have to be complicated. Nevertheless, you’ll want to know what all of the various settings are before you start adjusting things.
Here is a detailed list of monitor settings for gaming that you should consider changing:
1. Resolution
Screen resolution refers to the visual dimensions of your display in terms of pixels per inch. The display resolution you select determines the clarity of your images.
A higher resolution translates to clearer, high-quality displays, while a lower resolution results in blurred images. For Full HD displays, the resolution is 1080p, or 1920×1080 pixels.
The best resolution for gaming depends on your preferences. If you are looking for incredible graphics, select 3840×2160 (aka “4K”), but 1920×1080 would be an ideal choice if you value gaming performance.

Ultimately, the best resolution really depends on the size of your monitor and the distance from which you are viewing it. More on that in a moment.
Here are the steps to adjust the resolution of your monitor:
- Head to the “Control Panel” on your PC
- Go to “Appearance and Personalization”
- Click “Adjust Screen Resolution”
- Move the slider to your desired display resolution
2. Optimal Viewing Distance
The optimal viewing distance might not be a “setting,” but it has a massive impact on your overall gaming experience.
It refers to the distance from the monitor to your seat, which allows the best view without straining your eyes.
Gaming can be thrilling and captivating, meaning you are likely to spend hours behind the screen doing what you love.
However, sitting too close to the monitor can be harmful to your eyes, and that’s why you need to follow the recommended optimal viewing distance.
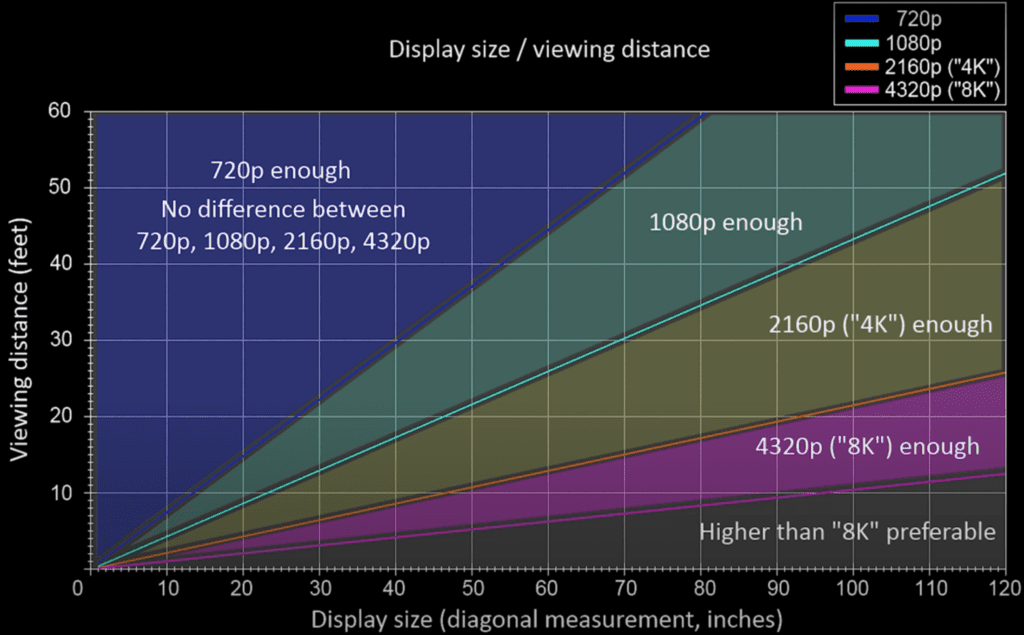
The ideal range depends on the size of the monitor and the set resolution. The rule of thumb is to sit 1.5 times the size of the monitor away.
For instance, if the size of your monitor is 40 inches, you should sit 60 inches (about 5 feet) away.
Here is a great visual detailing the best screen resolution, taking into account both the display size and viewing distance!
3. Refresh Rate
The screen resolution and the refresh rate are almost synonymous.
In layman’s terms, the refresh rate defines the “smoothness” of your displays. It indicates how many times your monitor can refresh your images per second.
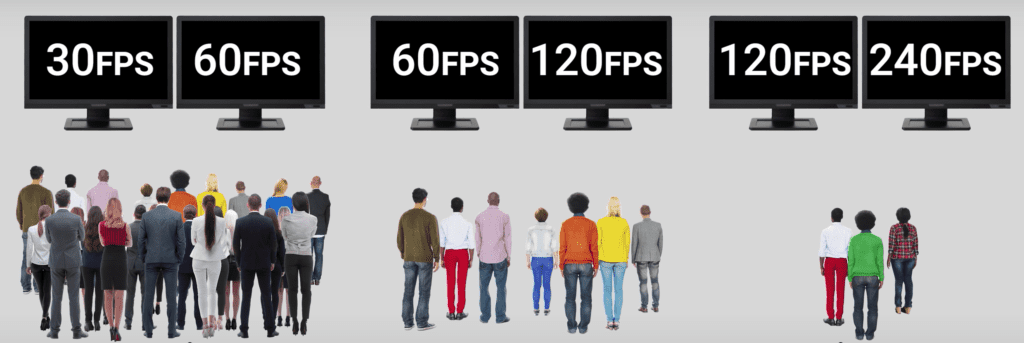
Standard monitors have a refresh rate of 60Hz, while high-end gaming monitors offer up to 240Hz. While a higher refresh rate ensures smoother displays, most games work optimally with a refresh rate of 120Hz.
The reality is, as you get faster and faster refresh rates, it gets more and more difficult to even notice the difference. Going from 30Hz to 60Hz is an extremely noticeable improvement. But going from 120Hz to 240Hz? Not so much.
Something else worth keeping in mind is that you need the hardware (graphics card etc.) to back up and support the refresh rate of your monitor!
So don’t go and spend extra money on a 120Hz monitor only to realize your graphics card can only support 60Hz.
Here’s how to adjust the refresh rate:
- Right-click on your desktop
- Select display settings
- Click “Advanced display settings”
- Pick your monitor from the drop-down menu
- Click display adapter properties
- Select the monitor tab from the dialogue box that pops up
- From the monitor settings drop-down menu, choose your desired refresh rate
4. Aspect Ratio
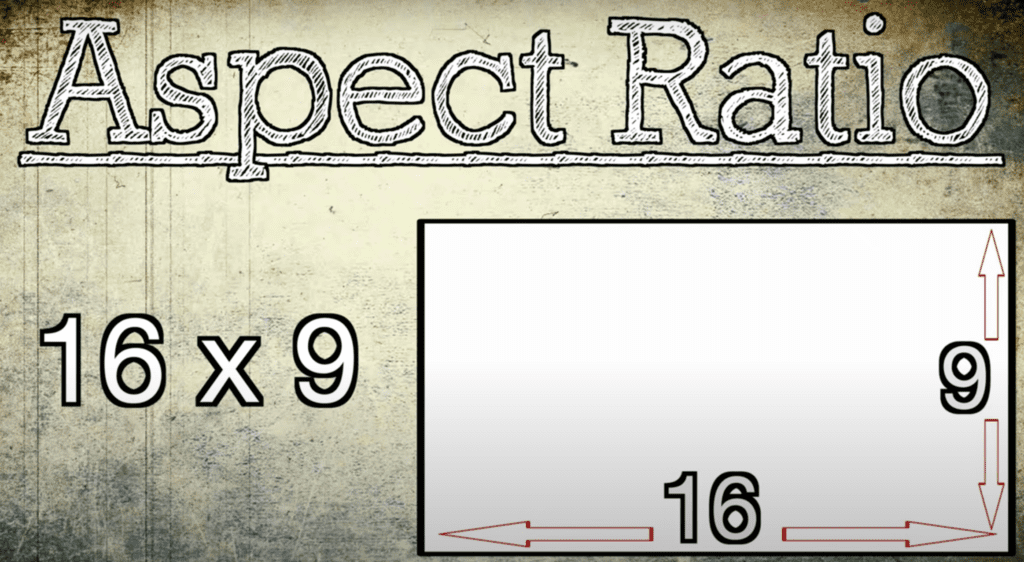
Many people confuse between aspect ratio and screen resolution due to their striking similarities. While resolution defines the number of pixels in an image, aspect ratio describes the height and width of the image on the screen.
If you want to enjoy your gaming, consider adjusting the aspect ratio of your monitor. The standard aspect ratio for gaming is 16.9, but you can change it to 21.9 if you have a bigger or 4K monitor.
Note that if you are using Windows 10, you will have trouble adjusting the aspect ratio settings. The aspect ratio is only adjustable via your graphics card control panel. Here are the steps:
- Right-click on your desktop
- Select Graphics Settings
- Navigate to “Scaling”
- Click “Customize Aspect Ratio”
- Adjust the setting accordingly
5. Brightness and Contrast
Brightness and contrast settings for gaming are all a matter of personal inclinations. Some gamers prefer playing with extremely bright monitors, while others prefer to balance between brightness and contrast.
No matter your preferences, changing your monitor’s brightness and contrast settings can dramatically impact display quality either negatively or positively.
Too much brightness and improper contrast can cause headaches and eye strains, while dark screens can make your gaming experience dull and unexciting.
The recommended brightness setting for gaming is 250 to 350 candela per square meter (cd/m2), while the contrast ratio should be 70-80%.
Adjusting your monitor’s brightness is relatively easy, and you can do it from the monitor menu or your PC.
Here are the steps:
- Press the menu button on your monitor
- Select brightness and adjust the setting accordingly
- Select contrast and change the setting as desired
Option 2
- Go to the settings app on your PC
- Navigate to display settings
- Adjust the slider to change the brightness and color levels
6. Color Temperature
The color temperature of a monitor describes how a particular color will appear when measured using the Kelvin Scale.
When you heat various objects, they will display light in different colors ranging from red to blue. When you decrease the color temperature to zero, your monitor will display red, while increasing it will turn the screen blue.
Color temperature plays a vital role in determining picture quality when gaming or using your PC. The default color temperature for gaming is 6500K, but you can adjust it according to the specific game you are playing.
This video does a great job explaining a few different ways to get your monitor’s color temperature just right:

- Press the menu button on your monitor
- Navigate down to color settings
- Select any of the preset colors or adjust individual colors accordingly
7. Gamma settings
Gamma describes how quickly an image can transition from black to white and vice versa on a digital display. This setting essentially adjusts the output of an image depending on your visual needs.
If you prefer darker displays, consider adjusting the gamma setting very high. Low and medium gamma settings display brighter images.
The ideal gamma setting for gaming is between 2.2 and 2.4, and adjusting the values is easy. Here are the steps:
- Navigate to control panel
- Click “Display”
- Click “Advanced display settings”
- Next, click “Display adapter properties”
- Go to the color management tab
- Under color management, click “Calibrate display”
- Start the calibration process
- Adjust the slider to change gamma settings
8. Sound settings
Most modern-day monitors come with tiny and unimpressive in-built speakers. You may not bother to use these speakers, but you should remember that sound is a big part of gaming.
If you have yet to buy standalone surround gaming speakers, you may have no other option but to use what you already have.
Here are the steps on how to enable your monitor’s sound settings:
- Connect your monitor to your PC and turn them both on
- Access “On-Screen Display” settings by pressing the menu button on the monitor
- Go to the audio menu to ensure the speakers are unmuted
- From your PC, right-click the speaker icon on the system tray
- Select “Playback devices”
- From the ensuing list, right-click the monitor speakers and “set as default.”
Other ways to calibrate the best monitor settings for gaming
If you don’t want to go through the trouble of adjusting individual monitor settings, there’s an easier way out. You can calibrate your monitor for gaming using the On-Screen Display (OSD) settings.
Most modern monitors come with an integrated menu that allows you to customize basic functions.
The settings panel has a dedicated menu for gaming, where you can change the display mode and resolution.
You can also activate functions like overdrive to eliminate ghosting, low blue light to prevent eye strains, and black equalizer to change the monitor’s black levels.
To access OSD settings, press the menu button on the side or front of the monitor and use the + or – buttons for the desired adjustments.
Conclusion
Every gaming monitor is different.
Even if you buy a similar monitor from the same brand, they will most certainly have differences in color temperature, color accuracy, maximum brightness, and gamma settings.
This means the best settings for gaming on one monitor may not necessarily be the best on another monitor. The key is to make small adjustments to each of these settings and test them as you go.
Once you find the combination that works best for you, lock it in.
Thanks for reading, and happy gaming!