Left AirPod Not Working (This Fix Worked for Nearly Everyone!)
Apple AirPods are a great product – they’re the best-selling wireless earbuds globally! But, they do come with their fair share of challenges. One such challenge reported by many users is their left AirPod not working.
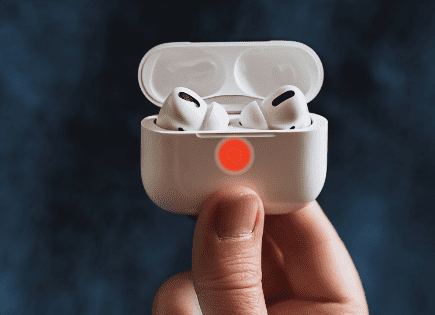
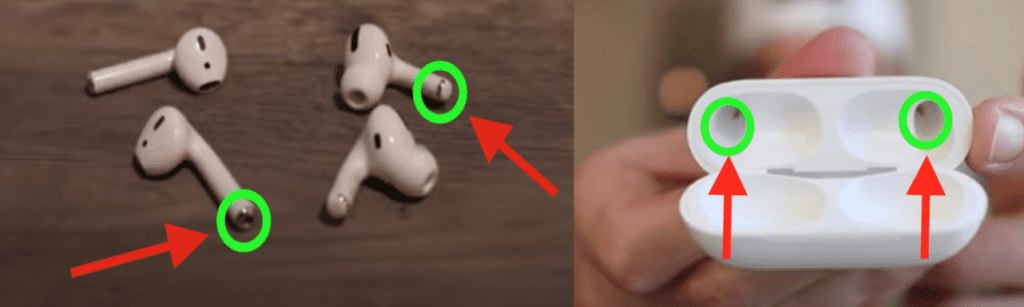
If your left AirPod is not working, you need to reset your AirPods. Go to Settings > Bluetooth > Info icon next to your AirPod name > Forget This Device. Then, with both AirPods in the case and the lid open, hold the button on the back until the status light blinks white.
This will entirely reset your AirPods and your left AirPod should successfully connect with your phone now.
While resetting your AirPods will work for over half of you, the other half will need to try a variety of other troubleshooting steps.
The fixes I’ve included below are PROVEN fixes, meaning they successfully fixed a left AirPod that wasn’t working for someone else. They are all easy to implement, so make sure you actually try each one before reaching out to Apple support.
Put the left AirPod back in the charging case
Before you reset your AirPods, here’s a short-term solution that works for me when I don’t want to reset my AirPods. It works the majority of the time when one AirPod is not working.
When one AirPod is working, and the other is not, try these steps:
- Put the AirPod that is not working back in the case for a few seconds.
- Take it out and put it back in your ear. Listen if it works
- If not, take the opposite AirPod out of your ear and put it back in the charging case
- Again, take it out and put it back in your ear. Listen if it works
- If again it does not work, take both out and put both back in the charging case
- Again, take it out and put both back in your ear. Listen if it works
This often works for me when I don’t have the time to reset my AirPods. Unfortunately for me, this is a recurring issue that seems to come back at some point. Hopefully, this trick helps for a really quick fix.
Reset your AirPods
In most cases, simply resetting your AirPods (removing the connection, then repairing them) will fix your left AirPod.
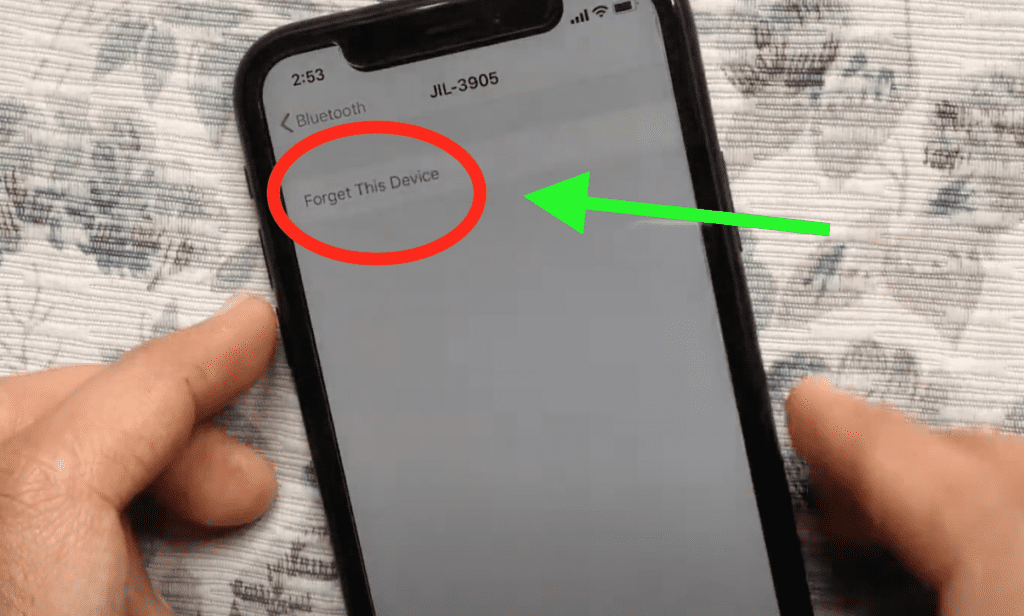
To start, you’re going to need to “Forget This Device.” To do this:
- Go to Settings
- Then select Bluetooth
- Click the info icon next to your AirPods
- Select “Forget This Device”
- This will successfully remove your AirPods from your phone
Now that your AirPods are removed, you’ll need to repair them. To repair your AirPods, follow these steps:
- On your phone, make sure Bluetooth is ON
- Put both AirPods in the charging case and open the lid
- Press and hold the button on the back of the AirPod charging case until the case status light blinks white
- Your AirPods should pop up on your phone- Select “Connect”
- Your AirPods will take a few seconds to connect, but then you should be good to go!
This process will entirely reset your AirPods and your left AirPod should successfully connect with your phone now.
I recommend trying this fix 2-3 times if it didn’t work the first time. In my experience, it can take a few resets before the problem gets resolved.
If you’re part of the unlucky few that this didn’t work for, don’t panic. There are several other fixes that will likely solve this for you so read on.
Clean left AirPod and left charging port
If your left AirPod is still not working after a reset, it’s likely due to dirt, grime, and ear wax that has built up on your AirPod and down inside the charging port, causing it to sound quieter, not charge, or both!
Start by grabbing a Q-tip and gently wiping the bottom metal ring of your left AirPod clean. Then open your charging case, and clean out the left charging port. Make sure to go deep, all the way down to the bottom.
If you need to, you can add a little isopropyl alcohol to the end of the Q-tip to really get a deep clean. Don’t worry, Apple approves!
Next, check the speaker of your left AirPod. If you have AirPods Pro, you may have to remove the tip to check if the speaker is covered in gunk. Again, use a Q-tip to clean up any caked-on ear wax or dirt.
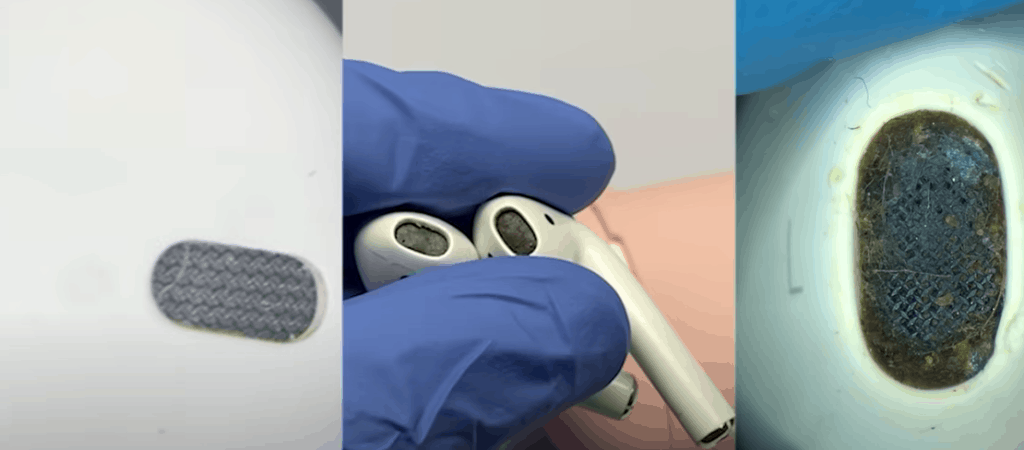
You may find it helpful to grab a flashlight or use the flashlight on your phone to get a better look.
If you make sure those charging connection points are nice and clean and the AirPod speaker and sensors are clear, you’ll likely resolve this issue for good.
Turn Bluetooth off and then on again
Another easy and proven fix to try is to reset your phone’s Bluetooth. This is the quickest possible fix, and it works for me about half the time.
To reset your Bluetooth:
- Go to Settings
- Then select Bluetooth
- Toggle Bluetooth OFF and wait 20 seconds
- Then toggle Bluetooth back ON
- Reselect your AirPods and try to connect
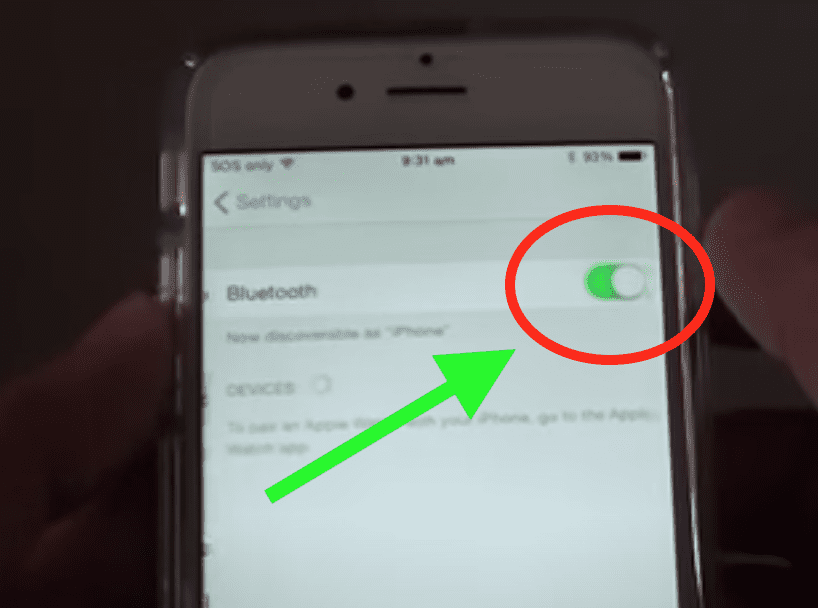
Alternatively, you can swipe down on the home screen and then click on the blue Bluetooth icon, turning it grey (off). Wait 20 seconds, then click the Bluetooth icon again turning it green (on).
If this doesn’t work for you the first time, you can try it once or twice more before moving on to the next fix. Typically, just by forcing your phone to try and reestablish a stable Bluetooth connection, you can fix this problem.
If your left AirPod still isn’t working, try to turn off Automatic Ear Detection…
Turn off Automatic Ear Detection
By default, AirPods have technology built into them to sense when they are in your ear before they start to play audio from your device.
While the tech is cool, anything that goes wrong with this process will lead to an incomplete connection. It’s very possible that your left AirPod’s detection sensor isn’t working.
The number one reason this feature acts up is from dirty headphones. As we discussed above, built-up ear wax, dirt, and grime can cake over and block important sensors on your AirPods.
You can start by simply turning off Automatic Ear Detection to see if that’s what’s causing the issue. Keep in mind that once you turn this off, your AirPods will keep playing even when you take them out of your ears.
Here’s how to turn off Automatic Ear Detection:
- Go to Settings
- Then select Bluetooth
- Tap the Info button next to your AirPods
- Scroll down and toggle OFF Automatic Ear Detection
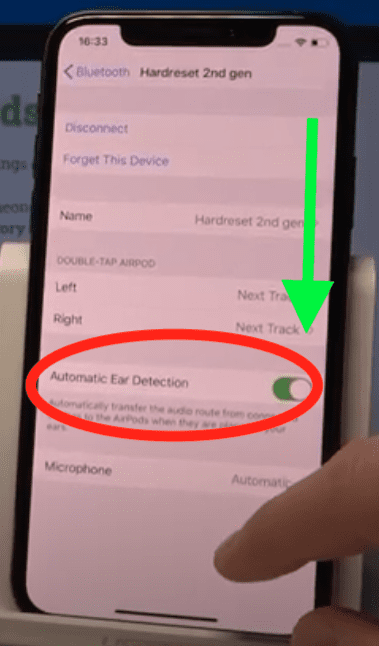
Hopefully, this solution fixed your problem. If it did, you should try cleaning the left AirPod once more, and then you can try turning Automatic Ear Detection back on and see if everything is working correctly.
Fully charge your AirPods
Using an Apple-certified charger, give your AirPods a complete charge. I’m talking about a 100% charge for both AirPods and the case!
As your AirPods age, any charge lower than 30% can start to cause some issues in establishing a steady connection. In my experience, even more problems start to arise when they are less than 20% charged.
It will take a few hours to get your AirPods fully charged (obviously this largely depends on how charged they were to start) but it’s a must.
Whenever I am having issues with my left AirPod, I like to give it a full charge. This helps rule out the possibility that it isn’t getting enough power.
Hopefully, by now, you’ve fixed your problem, but if you haven’t there is still hope…
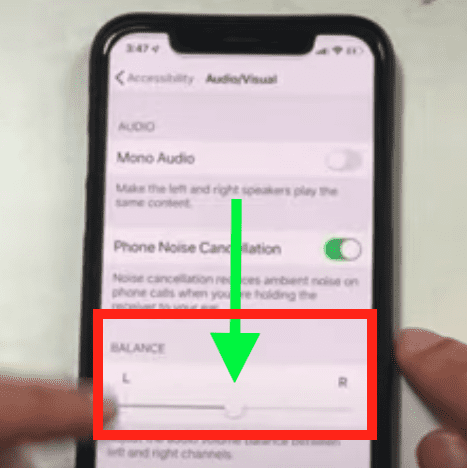
Make sure the audio volume is balanced
While unlikely, I’ve seen this fix work for several people before – their left AirPod wasn’t working because of an incorrect audio setting on their iPhone.
There is an audio setting on your phone called “Balance” that allows you to set the audio volume percentage being played between your left and right AirPods.
You want to make sure that this setting is in the middle, meaning the audio volume is spread evenly between both of your AirPods.
If this setting is adjusted all the way to the right, all the audio will be played from your right AirPod and your left AirPod won’t work!
To check your audio balance:
- Go to Settings
- Scroll down to Accessibility
- Under Hearing select Audio/Visual
- Confirm that Balance is set directly in the middle of L & R!
If your balance isn’t directly in the middle, simply slide it and adjust accordingly.
Turn off any nearby Bluetooth devices
Another possible fix to get this issue resolved involves turning off any and all Bluetooth devices nearby. This means actually powering them down.
If you have other nearby phones, headphones, mouses, keyboards, etc., it is possible that there is some interference happening.
You can be sure to avoid this by shutting all those devices off.
Alternatively, you can go to your iPhone and “Forget This Device” for each and every one of these Bluetooth gadgets. This process was defined above if you need a reminder for how to do this.
By taking this step, you can be sure that no interference is happening with your left AirPod.
Restart your phone
Sometimes the issue isn’t necessarily with your AirPod, but instead, it’s caused by your phone.
There are really two ways to go about resetting your phone. The first is simple, just fully power your phone down.
You’d be surprised how many issues you can solve by just doing the old power-off, power-back-on fix.
This is primarily because a phone reboot clears the current state of your phone’s software, so any issues your phone has run into should get wiped clean.
To power down your phone, press and hold the side button and either volume button at the same time (older versions of the iPhone only require you to hold the side button).
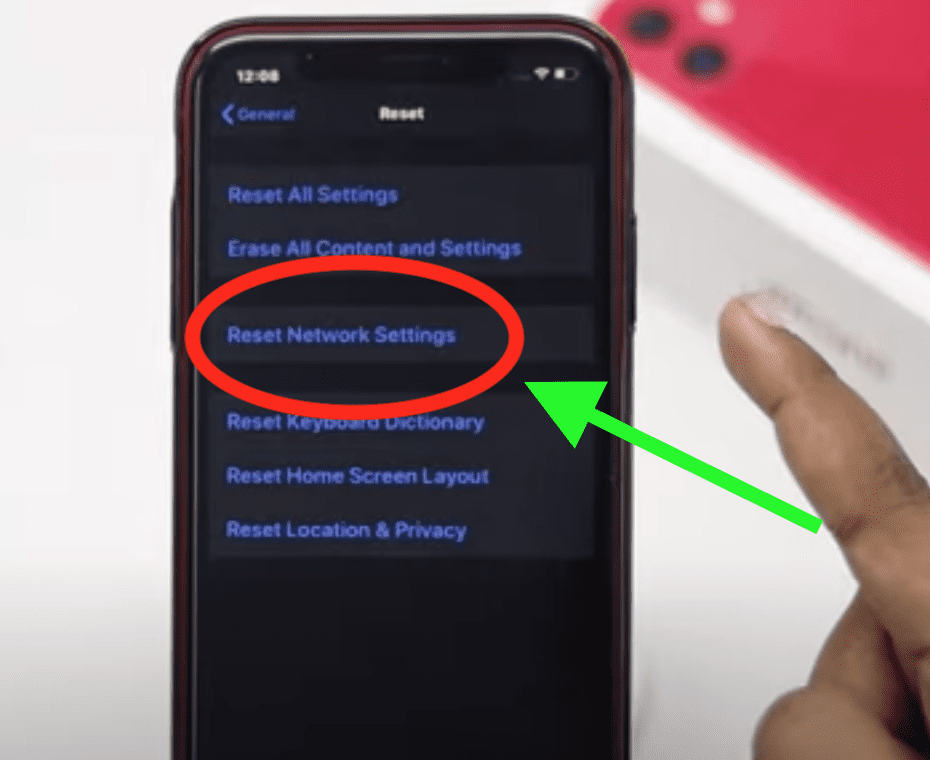
The second way to reset your iPhone is to Reset Network Settings. This action removes all previous connections and disconnects you from any active networks you’re on.
To Reset Network Settings on your iPhone:
- Go to Settings
- Scroll down to General
- At the bottom, select Reset
- Finally, choose “Reset Network Settings”
Replace the left AirPod
Now, it’s time to deal with the unfortunate reality that for a very small percentage of you, your attempts at fixing your left AirPod will result in having to get a replacement.
But, before you go looking for a completely new set of AirPods, you should:
- Bring your AirPods to a local Apple store and have them check your warranty!
- Know that you don’t have to buy an entire set if one earbud is broken.
If you’ve owned your AirPods for less than a year, your warranty will cover the cost of a repair and/or replacement!
If it’s been more than a year, you can buy a replacement on the Apple website. The cost of a single earbud is about $70 for standard AirPods and $90 for the AirPods Pro.
It’s not exactly a cheap solution, but it is way better than having to buy a brand-new set of AirPods.
Conclusion
If your left AirPod is not working, don’t panic. This is a fairly common issue with several proven fixes:
- Reset your AirPods
- Clean your left AirPod and the left charging port
- Turn Bluetooth off and then back on
- Turn off the Automatic Ear Detection feature
- Give your AirPods a complete charge
- Balance your AirPod audio
- Turn off any nearby Bluetooth devices
- Restart your phone
If you’ve tried all of these fixes and your left AirPod still isn’t working, it’s time to consider replacing it with a new one.
Hopefully, you were able to get your AirPods working well again! Thanks for reading!